Standard disassembly process and safety technical points of screw pump of asphalt distributor
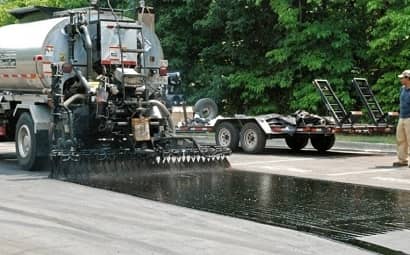
Screw pump is the core conveying component of asphalt distributor, which plays a key role in asphalt pressurization, pressure stabilization and quantitative transportation. Its working condition is long-term in high temperature, high viscosity and impurity medium environment, and it is easy to have stator wear, rotor stagnation, seal leakage and pressure instability. Regular disassembly, maintenance and replacement of worn parts are the core procedures to ensure accurate distribution and stable operation of equipment. Asphalt screw pump is different from ordinary water screw pump, there are high temperature residual oil, asphalt adhesion, parts easy to stick to death and other characteristics, disassembly process must follow the first pressure relief cooling, after disassembly, light disassembly, marking the principle of return, to prevent violent disassembly caused by component deformation, seal damage, safety accidents. Combined with the practical operation specification of construction site, this paper fully explains the standardized disassembly process, key operation points and safety precautions of screw pump of asphalt distributor.
Preparation before disassembly
Asphalt screw pump with temperature, pressure, residual oil, direct disassembly is easy to cause burns, oil spray, slip and other safety hazards, at the same time easy to cause parts pollution, damage, must complete the pretreatment before disassembly.
Equipment shutdown and power-off lockout
Turn off the operation power supply and oil pump control switch of the whole machine, cut off the power supply of the screw pump driving motor, pull out the control key and put up a warning sign to prevent false start. After the equipment is completely shut down and the motor stops rotating, the follow-up operation can be carried out to prevent live and belt operation.
Cooling and pressure relief, evacuation of residual pressure and residual oil
After asphalt operation, there is residual high temperature asphalt in pump body and pipeline, and the temperature can reach above 160℃. It is necessary to naturally cool down to below 60℃ to avoid high temperature scald. Slowly open the pipeline relief valve and exhaust valve to release the residual pressure inside the pump body to prevent asphalt spray splashing at the moment of disassembly. Then open the pipe drain port, empty the pump cavity, residual asphalt medium in and out of the pipeline, reduce oil leakage and component adhesion during disassembly.
Site cleaning and tool preparation
Clean up sundries around the pump body, level the operation area, lay waterproof and oil-proof mat cloth to prevent parts from being contaminated with sediment and oil, and facilitate the collection of residual oil. Prepare a complete set of socket wrench, ring wrench, copper rod, rubber hammer, special puller, cleaning brush, high-pressure air gun, sealed storage box and other tools. It is strictly prohibited to use sharp iron to knock the pump body violently. At the same time, prepare rags, diesel oil and cleaning agents in advance for later part cleaning.
Component alignment mark
Before disassembly, use a marker pen to mark the alignment of pump flange, motor base, coupling, end cover and other matching parts, and mark the installation direction and position. The matching parts of asphalt screw pump have high precision, poor interchangeability, and are easy to be misaligned and coaxial when installed without marks, which leads to vibration, abnormal noise and oil leakage in the later stage.
Standardized step-by-step disassembly process of asphalt screw pump
Follow the disassembly sequence of outer first, inner first, pipeline first, pump body first, accessory first, main engine first, uniform speed and light operation throughout the whole process, prohibit hard prying and hard smashing, and protect the precision parts of sealing surface, rotor and stator.
Remove the inlet and outlet pipes and accessories
Loosen the screw pump inlet, outlet flange fixing bolts, slowly separate the pipeline and pump body, properly remove the flange sealing gasket, O-ring, put into a special storage box to avoid extrusion deformation, loss. Remove the fixed bracket, protective baffle and temperature and pressure sensor wiring around the pump body, and arrange the fixed circuit to prevent the circuit from pulling and breaking. If pipeline adhesion asphalt caking, first with cleaning agent softening cleaning before dismantling, do not forcibly tear pipeline.
Separate the drive motor from the pump body coupling
Clean the asphalt grease on the surface of the coupling to expose the connecting bolts and buffer pads. Loosen coupling fastening bolts diagonally and evenly, remove bolts, washers and buffer rubber blocks, and store them by category. Manually rotate the motor and pump shaft, check that there is no card lag, slowly separate the coupling between the motor end and the pump body end, confirm that the transmission structure is completely separated, and eliminate the pulling stress of subsequent disassembly.
Remove the fixed base of pump body and take it offline as a whole
Loosen the screw pump machine base and frame fixing bolts, two people cooperate to support the pump body, slowly move the screw pump from the installation position, and place it on the flat pad cloth. Keep the pump body level during the whole process to avoid leakage of residual asphalt and dislocation of parts caused by inclination.
Remove the pump body end cover and drain
According to the principle of diagonal intersection and gradual loosening, gradually loosen the fastening bolts of the front end cover and discharge body of the pump body to avoid deformation of the pump body and damage of the sealing surface caused by unilateral stress. After all bolts are loosened, gently knock the periphery of the end cover with a rubber hammer to loosen the adhesion asphalt, remove the front end cover and the exhaust body steadily, place them properly, and pay attention to protecting the mechanical seal contact surface inside the end cover to prevent collision and scratch.
Disassemble stator assembly
The asphalt screw pump stator is made of rubber wear-resistant material, which is easy to tear and deform. It is the core protective component of the disassembly machine. Loosen the fastening bolts connecting the stator and the pump housing, slowly rotate the pump shaft clockwise manually, and pull the rubber stator out of the pump housing smoothly with a slight external force. If the stator is stuck due to asphalt agglomeration, use special cleaning agent to soak and soften, prohibit violent prying and tearing, and prevent cracking, degumming and deformation of rubber stator.
Remove rotor, drive shaft and universal joint assembly
After stator removal, the internal rotor, drive shaft and universal joint structure are clearly exposed. Slowly pull out the screw rotor, and then take out the intermediate transmission shaft, universal joint pin shaft, connecting sleeve and other transmission components in turn. During disassembly, the rotor shall be kept horizontal throughout the whole process to avoid bending of the spiral structure under force, and at the same time, asphalt lumps and impurities attached to the surface of the component shall be cleaned. Focus on checking the wear condition of universal joint pin shaft and record the condition.
Remove mechanical seal and packing assembly
Mechanical seal is the core component of screw pump leakage prevention, with high precision and easy to damage. Loosen the fixing bolts of the gland, remove the gland steadily, gently clamp the mechanical seal moving ring and static ring by hand, and remove them vertically and slowly. Do not pry or scratch the sealing mirror surface. If packing seal structure, loosen packing gland, remove old packing and seal washer in turn. All seals are housed separately to avoid wear caused by mixing with metal parts.
Disassemble tailstock bearing assembly
Perform this procedure only when servicing bearings and spindles. Loosen the bolts on the end cover of the tailstock of the pump body, remove the tailstock, use a special puller to remove the bearings, retaining rings, shaft sleeves and other parts smoothly, and do not knock the inner and outer rings of the bearings to prevent bearing deformation and precision failure.
Cleaning and inspection of parts after disassembly
After the disassembly is completed, all parts shall be sorted, cleaned and inspected immediately to provide a basis for repair, replacement, and reassembly to avoid mixed parts, loss and omission.
Component cleaning
Use diesel oil or special asphalt cleaning agent to soak metal parts, cooperate with brush and high-pressure air gun to clean asphalt residue, impurities and oil stains on the surface; rubber stator, mechanical seal and other vulnerable parts shall be wiped clean with soft cloth, and strong acid and alkali soaking and hard brush polishing are prohibited to prevent corrosion damage. All parts are cleaned and dried for later use.
Classification check judgment
Scrapped replacement parts: rubber stator cracking, aging, deformation; mechanical seal mirror wear, fuzz, leakage; bearing jam, abnormal noise, excessive clearance; universal joint wear loose, aging hardening of filler, the above parts directly replaced with new parts, reuse is prohibited.
Repairing reusable parts: rotor slightly incrustation, no bending wear; transmission shaft without deformation, no crack; pump shell, end cover sealing surface without scratch deformation, clean and polished can be reused normally.
Safety and quality control points for full disassembly
Strictly control temperature conditions: it is strictly prohibited to disassemble the machine at high temperature, and it is strictly prohibited to disassemble the pump body before the temperature drops to normal temperature to prevent asphalt burns and rubber stator brittle cracking at high temperature.
Put an end to violent operation: all bolts should be tightened diagonally in different degrees, parts must be removed after adhesion is softened, and it is forbidden to knock on precision parts such as sealing surface, rotor and stator.
Full mark homing: all accessories, bolts, washers classified storage, alignment marks clear, to ensure accurate reassembly, avoid wrong assembly, missing assembly.
Protective sealing parts: mechanical seals and rubber stators are delicate parts. Handle them gently during disassembly, handling and cleaning to prevent collision, scratch and distortion.
Fire protection: clean asphalt oil, use cleaning agent, away from open fire, high temperature equipment, take fire prevention measures to eliminate fire hazards.
Temporary protection and storage after disassembly
The pump body parts that are not reassembled in time shall be protected against dust, rust and aging: the exposed metal parts shall be coated with a small amount of rust preventive oil, and the rubber stator and sealing parts shall be sealed with dust film and placed in a cool and dry place to avoid exposure, extrusion and moisture; all bolts and small accessories shall be uniformly stored and numbered to prevent loss and disorder.
SUMMARY
Screw pump disassembly of asphalt distributor is a safety, precision and standardization equipment maintenance process, which is different from ordinary mechanical disassembly. The core difficulty lies in high temperature asphalt adhesion, rubber parts vulnerability and high sealing precision requirements. Strictly follow the standardized process of "shutdown, cooling and pressure relief-marking and disassembly-step-by-step disassembly-cleaning inspection-protection and storage", which can not only complete equipment disassembly and maintenance efficiently, but also protect precision parts to the maximum extent and avoid manual disassembly failure. Standardized disassembly operation is the basis for ensuring stable pressure, uniform distribution and no leakage after screw pump reinstallation, which can effectively prolong the service life of equipment and reduce the probability of road construction failure and maintenance costs.